Showing posts with label craft. Show all posts

Friday, 11 April 2014

DIY: no-sew mad hatter easter bonnet


The other day I posted a fun DIY for making your own flower headpiece for Easter. Today, I've got another fun Easter project to make over the school holidays.

Monday, 7 April 2014

DIY: paper flower headpiece [easter]


Easter is less than two weeks away and if you're anything like me, then you'll probably be leaving things like decorations and Easter bonnet's until the last minute. So, in an attempt to save you and me from any last minute runs to the local craft store, I've come up with a couple of Easter bonnet headpieces for you and the small people in your life.

The first one which I'll show you today is a paper flower headpiece which is made using coloured cardstock, a couple of downloadable templates, scissors and hot glue. Easy peasy, fun and effective.

Tuesday, 17 September 2013

DIY: piñata wrapping paper


Here's an easy and fun way to wrap a birthday gift... make your own piñata gift wrap!

Here's what you need:

  • tissue paper in different colours
  • scissors (I used herb chopping scissors with multiple blades, but you can use plain scissors)
  • glue stick
  • kids kraft paper or butchers paper

Monday, 5 August 2013

5 ways to use felt pom poms


pom-pom 
pom-pom (also spelled pom-ponpompom or pompon) is a loose, fluffy, decorative ball or tuft of fibrous material. Pom-poms may come in many colors, sizes, and varieties and are made from a wide array of materials, including woolcottonpaperplastic, and occasionally feathers
source: wikipedia

But you knew that already, right!?

If your house is anything like mine, then you'll have more bags of lollypop sticks, wooden clothes pegs, glitter, tissue paper and felt pom poms than you know what to do with. You might have supplies left over from a creative project, or you may have purchased them with the intention of making something with them but instead they've just sat unused taunting you all this time.

I'm slowly making my way through my craft supplies and coming up with new ways to use them. Today, I've come up with 5 colourful ways to use up your felt pom poms.

Thursday, 25 July 2013

make a paper garland using cupcake wrappers, straws and tissue paper

There's nothing wrong with store-bought paper garlands, but I'm all about custom, unique and one of a kind. I also think that being known for being creative amongst my group of friends, there's a level of expectation that I will make most things from scratch myself.

So when I was planning the decorations for my daughter's recent first birthday party, I started making tissue paper flowers. I wasn't sure exactly what I was going to do with them, but I knew that they would have a place within the overall confetti theme.

But it wasn't until I found some jumbo length straws in a two dollar shop that I got an idea. An idea for a fantastic straw and paper garland.  Here's how to make a paper garland in 5 simple (colourful) steps...

Wednesday, 1 May 2013

5 creative uses for your DYMO label maker


It may come as no surprise that I'm an appreciator of stationery and office-related tools and accessories. However, anyone who steps into my craft studio would be forgiven for thinking I was moonlighting in office administration. I like to be organised and I like the challenge of using seemingly boring and conventional items in a variety of creative and unconventional ways.

So I was rather excited to be set a challenge on how to use a DYMO label maker creatively. Sure, you can use it to add labels to index tabs in ring binders and the like, but I have come up with some other ways in which you can get creative mileage out of your label maker at home.


ONE: organise your craft tools 

I have sets of drawers throughout my craft studio. It's the only way I can stay semi on top of where things are stashed. Plus drawers can put a pretty face on the mess that might lay within.

It's all about the pretty face. Especially if you're anything like me and regularly do a craft "dump and run" when cooking and other domestic duties call.

So, why not make things even easier by creating labels for your drawers.


TWO: give your notebooks names
I like a good notebook. I have one for "ideas", one for scribbling in, another for art journalling, one for sticking random memorabilia into and a few more with to-do lists and equally as random stuff in them.

I do my best to remember which is for what, but now I have my handy-dandy friend to help me give them all names.

Use some contrasting washi tape as a base for your clear plastic labels. It will add a bit of fun and element of colour.


THREE: magnetic meal planner
Over the years I've tried various methods to staying on top of planning dinners for the week. The fridge is the obvious communal place for family members to have their input on what will be consumed for the week.

Print out labels for each day of the week along with each dish that's in your dinner repertoire. Stick the labels onto unwanted large flat advertising magnets (eg "Jim's Plumbing") and trim them down to the size of the label.

Stick them onto your fridge and each week, planning out dinners (and grocery shopping) will be a breeze!


FOUR: jars need names too
A few years ago, in a bid to be more grown-up, I started making my kitchen more functional. After several trips to Ikea, I had lots of lovely, some fancy and many functional things to make our home work better for us.

I bought jars. Lots of jars. I started filling the jars. I arranged them all in a pretty line. I forgot what was in some of said jars. I labelled jars. I now know what is in my pretty jars.

I realise "sprinkles" don't really need to be identified, but I couldn't very well leave them nameless.


FIVE: visual cues
Upon the suggestion of an instagram friend, I recently started a vision board. I chopped up magazines and collected lovely pictures and phrases of how I'd like my life to shape itself.

I started glueing all of my gathered items onto a large piece of poster card. But there were some obvious words missing which could not be found in my magazines.

I adjusted text heights and formats before printing labels with key words to add to my vision board.

You could do the same with scrapbooking. It's much quicker and economical than printing a page, cutting and then glueing. Especially if you only need a few words.

Here's some nifty facts about the DYMO LetraTag which I've used in these projects:

  • The labels come in paper, plastic, metallic and iron-on finishes in a range of colours (depending on the type of label).
  • It has the capabilities to print onto two lines
  • There are five font sizes
  • You can add borders around text
  • It is super easy to use 

Do you own a label maker? If so, have I inspired you to dust it off and use it creatively? What will you use it for?

Don't own a label maker? Well then, this is your lucky day. The folks over at Newell Rubbermaid have been very generous to give me a DYMO LetraTag to giveaway to one of my readers along with refill tapes.

Would you like to win? Read ahead for details...


DYMO COMPETITION DETAILS

  1. Entrants MUST be Australian residents. 
  2. To enter simply leave a comment on this post. It can be anything. You can tell me what you'd like to use the label maker for. Or whatever you'd like to say is fine.
  3. Entries open Wednesday 1 May 2013 and close Friday 3 May 2013. 
  4. I will randomly select a winner on Saturday 4 May 2013. Winner will be notified by email.
  5. The prize is a DYMO LetraTag LT-100H along with two refills with a RRP of AUD$69

Friday, 25 January 2013

preserving your kids memories


I had to think of another title for this post as I didn't want people to get turned away at reading the word "scrapbooking".  I totally get the connotations that the word is associated with. 

I am a scrapbooker from way-back. I'm talking old-school. Think early nineties. When I was still in primary school. I kept scrapbooks of stuff from school, camps I went on and places I visited. I still have them to this day. I cherish them.

I still enjoy scrapbooking things to this day, but I'm not your traditional scrapbooker who follows 12x12 layouts or one who purchases coordinating, seasonal kits. Nope. Not me. I'm a closet hoarder of anything paper-related which I like to cut, paste, staple and tape to make into my own embellishments. It's much more personal and unique than anything you could ever get in the shops.

I have made albums of our overseas trips which are like little pieces of artwork in book-form. They are great reminders of the adventures we've been on and a real treat to look through. But that's a whole other post for another time.

I want my kidlets to enjoy looking back on all the things they've seen, achieved, done and experienced. So last year, my son and I sat down and started a scrapbook filled with things that he's done. Mostly places we've been over the school holidays. He enjoys craft time with me as it's a way for us to bond and the scrapbook will serve as a great reminder of the adventures we've had together.

Scrapbooking can be an expensive habit, but it needn't be. Follow this simple little guide and you'll have a handy kit at the ready to record your children's' adventures too.


Handy supplies
My suggestion is to create a little scrapbook kit for the kids to have as their own. That way, they won't be touching (or losing) your supplies and will be more inclined to be proud of it. Grab an old shoebox and let the kids go crazy decoupaging it with some magazine cutouts or stickers. Use alphabet stickers to label it 'John's Scrapbooking Supplies Kit'. Then once it's finished, fill it with the following supplies. 

  • scrapbook - this doesn't need to be anything fancy. It can be an exercise book, ring-bound notebook or a school-type scrapbook. You're only limited by your imagination. Try Typo for some cute options.
  • scissors - get a pair that your kids can use comfortably. Faber-Castell do a great pair of kiddie scissors that are safe and easy for little hands to use
  • glue stick - make sure to use a quality glue stick like UHU, otherwise you risk having things fall out of the scrapbook over time
  • double sided tape or foam - some things are easier to stick down with double sided tape or foam. You can find some inexpensive tape in shops such as Kaisercraft
  • pens - encourage your kids to write a few words to go with each entry. This is great in the case of my 7 year old who hates writing. Pick up some cheap and cheerful coloured pens from Smiggle or Target
  • stickers - I'm yet to meet a kid who doesn't love sticking stickers to everything. Get them a few rolls of washi tape or some simple sticker sheets to embellish their pages. Typo is great for this.


Tips

  • Collect lots of maps, brochures, menus, entry tickets/stubs, postcards, souvenir coins (you know from those penny machines) and any other memorabilia from places you visit
  • Take heaps of photos and get your kids to select a couple to include on each page. Print them on your home printer or head to your local photo lab to have them printed for you
  • Have your kids make a list of things from the trip they remember such as "fave animal of the day", "top 5 things to do at X", "highlight of the day" and include their handwritten notes where possible (get them to write on a separate piece of paper first if they're not confident writing straight into their scrapbook)
  • Try to get the kids to record in their scrapbook as soon as possible after the event so that things are not lost or forgotten 
  • Use leftover brochures or printed materials to cut up and decorate the pages. The kids can make a collage or just use single images as stickers or embellishments
  • Use double-sided foam tape or dots to stick bulkier and non-flat things such as the souvenir coins to the pages
  • For younger kids you can even collect leaves to stick in with their photos (they should be pressed flat and allowed to dry before being stuck into scrapbooks). Over time they can look at all the different types, colours and shapes of leaves they've collected from all the different places they've been.
  • Make sure to include the date on the pages somewhere so that they can remember when they had their adventures.

Now let them have some fun with all their supplies and watch as they create their own memories.

Note: we recently had the pleasure of visiting Phillip Island to write a review for  Little Melbourne. The photos in this post are from my kiddo's scrapbook from that trip. If you're interested, you can read our review over here.

Monday, 14 January 2013

make this: deer head necklace organiser


I was recently invited to check out the newly opened Kaisercraft store at Uni Hill Factory Outlet. And frankly, how could I say no; Kaisercraft is one of my fave paper-craft brands. I already own a hefty supply of their stamps, papers, rub-ons and stickers which I regularly use in various craft projects.

If you're lucky enough to be within close proximity to this Kaisercraft store, I urge you to make a visit as you won't be disappointed. Upon entering the store, I was pulled in three separate directions; where I wanted to look, where my mister was looking and where my son was looking.  All three of us had found stacks of great supplies within minutes of entering. Each person with their own clear favourites (yes, we are a creative family).

My heart was racing. I was in paper heaven.  I tell no lie when I say that we had to leave the store to have a bite to eat and a whip around the other shops before returning to keep shopping in Kaisercraft. I had to have a breather as there was so much to choose from it was so difficult to make a selection. And lucky we went for a whip around the other stores as I picked up some cute washi tape from Typo and spied a pair of nautical inspired Keds wedges (shoes for those of you unfamiliar with the brand Keds) which are now on my must-have list.

So after some welcome distraction by other stores, it was back to Kaisercraft. There was so much to choose from and it was difficult to decide what to take home with me, but I finally settled on a fantastic deer head which I'd been looking at for a while. Obviously that's not all I brought home, but more on that later.

Oh, I have to mention, if you're a bargain shopper like me then you'll be happy to know that there are also plenty of clearance bins to choose from with items starting as low as 50c.

Although I do delight in the occasional scrapbooking session, I'm also a "beyond the page" kinda gal, so my mind was wandering as to how I could make this delightful deer head a functional piece too. With the antlers as inspiration, I decided to turn this raw beauty into a necklace organiser.  And here's how I did it in 10 simple steps.

1. Lay out all your pieces so that you know how much paper you're going to need and if you can double up any of your pieces on one page.

NOTE: I covered all of the head pieces (minus the antlers) in vintage magazine pages. I painted the two antler pieces in different colours. The mount (which the head is attached to) has been covered in 12x12 paper and the edges have been painted.

2. If you have specific prints, patterns or areas of the paper you want to be visible, line them up by holding the paper over the MDF piece and hold it up near a window so you can see the shape through the paper.

3. Glue your selected paper to one side of each piece of MDF and let it completely dry before proceeding to the other side. TIP: make sure you smooth out the paper after applying glue to your MDF piece. When gluing, remember that less is more. The more glue you use, the more bubbles you'll get in your paper - especially if it's thin.

4. Run your finger over the ridge of each shape so that you get a slight crease. It will make it easier to tear the paper away from the shape. It doesn't have to be perfect; you just want to remove as much of the excess paper as possible. Do this step before gluing paper to the other side. Repeat.

5. Using some sandpaper or an emery board, file the edges of all pieces so that the excess paper is filed away leaving you with nice neat edges.  If you are confident in using a power tool you could sand or buff off the paper using a Dremel or similar small power tool which comes with multiple attachment heads.

6. I used two different colours to paint the antlers. Two coats each, letting dry in between coats.

7. For the mount, I used a single 12x12 page from the 'Class of '87' range. Using a paint brush, spread the glue over the entire surface and stick the paper down.  Smooth it down and place it under a heavy large book to ensure it dries flat. Once dry, repeat the process as you did in step 4.

8. Paint the edges of the mount so that you cover all of the visible MDF, but be careful not to paint over the paper! If you're worried about this step, then I suggest painting the edges BEFORE you glue down your paper.

9. Paint your antler pieces. I chose to paint them in two different colours.  

10. Assemble all of the pieces, making sure they are pushed in and down all the way. I did not use any glue to hold the pieces together as the added layers of paper ensure a snug fit. Add a hook to the back, hang and admire!

If you're so inclined, you could cover one side of all MDF pieces in one type of paper or paint colour and do something different on the reverse so that you can flip the pieces over for a seasonal change!


Materials I used for this project:
Kaisercraft Dimensional Deer Head
Kaisercraft Class of '87 12x12 paper in 'Science Project'
Kaisercraft Paint in 'Spearmint' and 'Lime'
Vintage magazine pages
UHU craft glue

Now it's time for a little giveaway
Since I had so much fun shopping at the Uni Hill Factory Outlet store, I wanted to share some of the love.  Thanks to the lovely folks at Kaisercraft, I've got a little pack of goodies for one lucky person to win.  To enter this competition simply leave me a comment on this post making sure to include your email address (so I can contact you if you're the winner).  I'll randomly draw a winner on Friday the 18th of January 2013 at 8pm (Australian daylight savings time) - so you have until then to enter. 
Please note entry is open to Australian residents only.


Thanks to the lovely folks at Kaisercraft for giving me a gift voucher to spend at their Uni Hill Factory Outlet store in exchange for an unbiased post.

Monday, 21 May 2012

how to make bath bombs


About this activity:
This is a fun activity to do with kids and if yours are anything like my 6 year old who wants to be a scientist, they’ll love mixing up this “potion” in the kitchen.  You’ll not only have fun making them, but you’ll also know exactly what you’re putting in the bath!  No nasties here.

What you need before you get started:
1 ½ cups bicarbonate soda (grocery store)
½ cup citric acid powder (grocery store or chemist)
Sweet almond oil (chemist)
An essential oil such as peppermint, lavender or your favourite blend
Herbal teabags (chamomile, lemon, rosehip) or dried flowers
Food colouring (optional)
Sieve
Rubber gloves (to stop the food colouring from staining fingers)
Silicone ice-cube tray with fun shapes – mine is from Ikea but you can get them elsewhere too

How to make it:
For the bath bomb base: In a large bowl sift the bicarb soda and cirtric acid to ensure no lumps. 

Let’s start customising: you can make a variety of different smelling bath bombs and the easiest way to differentiate them is by the food colouring you use.  From the bath bomb base you’ll get approximately 2-4 batches of different bath bombs, dependant on the size of your ice-cube tray moulds!

In a separate bowl add ½ cup of your bath bomb base.  To this you’re going to add any other dry ingredients you want to use such as herbal teas, pot pourri and dried flowers such as rose petals or pot pourri.  Be as creative here as you like. My son doesn’t like “floaties” in his bath, so we limited our additions to fine chamomile tea rather than flower petals which will unfurl and increase once added to warm bath water.

In a separate small mixing bowl or measuring cup add ½ teaspoon of almond oil, a few drops of your desired food colouring (if you only have a couple of colours you can consider letting the kids mix the colours to make a third!) and a few drops of your chosen essential oil.  Mix them well so that they bond.  Now you’re going to add your wet ingredients to your dry ones and mix them quickly so that the bicarb and citric acid don’t fix too much.  You want to save some of that fizz for the bath!


I had to help my kiddo with the mixing part to make sure that the small amount of wet ingredients were thoroughly combined with the dry ingredients so that the bath bombs set properly.  Otherwise you’re going to end up with crumbly bath bombs that aren’t solid.


Once you’ve mixed it thoroughly, you’re going to start filling your moulds.  The trick here is to compact them down into the mould with the back of a teaspoon as you go and when you think you’ve reached the top use your fingers to press the mixture down into the moulds even more.  You’ll get quite a bit in each shaped hole. 


Tip: if they’re not squished down properly, they’ll come out in pieces rather than a solid shape.

Depending on the weather and humidity in the air your bath bombs will take 24-48 hours to thoroughly dry.  To get them out, you just flip your ice-cube tray upside down and gently push each bath bomb out of its hole onto a paper towel.


The bath bomb base (of bicarb and citric acid) can be stored in an airtight container if you find that you only use half a batch at a time – like we do.  Then you’ve got it sitting there ready for the next batch.

I hope you enjoy making your own bath bombs in different colours, shapes and scents just as much as you'll enjoy using them.

Original recipe from Kidspot

Tuesday, 21 February 2012

paper aeroplanes

Meet my weakness: paper-ANYTHING! 
I love making cards, I keep travel scrapbooks, I collect pretty pictures and cuttings from magazines, vintage books and newspapers and store them for that "perfect" project, I cut up scribbled-on Golden Books, I transform boxes into collage masterpieces, I collect security envelopes, I make art books and basically adore any type of paper project.
I love the tactility of paper and that it can be torn, cut, pasted, hole-punched, stitched, embellished and transformed into something magnificent.
So it's only natural that I have a magnetic attraction to vintage ephemera.  It is so versatile, can be used on many different paper projects and is so pretty and interesting to look at.
I found Paper Aeroplanes on etsy and could not resist their Fantastic Big Vintage Ephemera and Paper pack at a mere US$11. It's an assorted pack of 70 scrummy bits and pieces of paper ephemera varying from stamp size through to A5 size sheets. What is even better is that they are based in Australia, so no waiting for weeks for my package to arrive. It was in my letterbox within days of making my purchase.


There are postage stamps, cigar labels, vintage story book pages, tickets, board game pieces, playing cards, foreign language texts and an assortment of other various treats. And each pack is different. So you could order 2, or 3 or more!
So if you're anything like me and can't resist treasures of the paper kind, head over to Paper Aeroplanes and check out their delights.


P.S. All images used in this post are of the 'Fantastic Big Vintage Ephemera and Paper' pack which I ordered from Paper Aeroplanes.

Friday, 27 January 2012

neapolitan dreams

Neapolitan dreams granny stripe blanket
Thanks to the crochet workshop which Katie and I participated in last weekend, I now have the crochet itch.  We each received goodie bags care of Spotlight which were full of supplies to get us started such as crochet hook, knitting needles, haberdashery scissors, yarn, tape measure, wool needle and instructions. Thanks Spotlight!

My goodie bag contained a ball of pink and a ball of chunky orange yarn.  I pulled apart the granny square that I was practicing on during the workshop and thought I might attempt a granny stripe blanket instead using the pink yarn and some white and coffee coloured yarn which I'd already had in my stash. I quickly worked out the pattern for the blanket (thank goodness because I'm not really one for following instructions) and then it was all about getting the tension of the stitches right.

If you follow me on Twitter or Instagram you might have seen me tweeting pics the other day. 

Yesterday I spent the day crocheting, watching Mad Men (I'm up to season 2), sucking on Zooper Doopers and eating a delicious BBQ meal cooked by my beloved in honour of Australia Day. I have made much more progress on the granny stripe blanket than the above image leads one to believe following yesterday's crocheting marathon.

I'm hoping that this will become a blanket for the growing bump, but as we don't know the gender yet (another 5 weeks until we find out), I am just crocheting it for the sake of crocheting. My beloved says that we can gift it if we find out we're having another boy.

Head on over to Katie's place to see a photo of me "concentrating" on getting my granny square right at last weekends' workshop and more photos from the yarn bombing installation in Melbourne's City Square.

Monday, 23 January 2012

a good old yarn

Yesterday my lovely cute-as-pie friend Katie and I headed into Melbourne's City Square to partake in some yarney goodness.  Katie booked us into one of the workshops so that we could brush up on our crochet skills.  We both fumbled our way through granny squares (with a little help from the lovely teacher Andrea) and with a little more practice and some tension adjustments I think we'll be crocheting like pro's in no time.


But before the workshop, Katie willingly obliged and allowed me to indulge in my 2-week craving of churros and a shake. I'm sure it was rather painful for her as she of course had to join me in my indulgence and listen to all of my pregnancy complaints. Thanks Katie! You're a real pal.


We also took a moment to delight in the yarn bomb installation in City Square whilst waiting for our workshop to commence. All that marvellous colour, creativity and effort to transform regular overlooked trees into crafty wonders.


If you didn't manage to get along yourself, you can still pop by City Square and take a closer look at the bombed trees until the end of Feb.

Monday, 14 November 2011

christmas on a shoestring

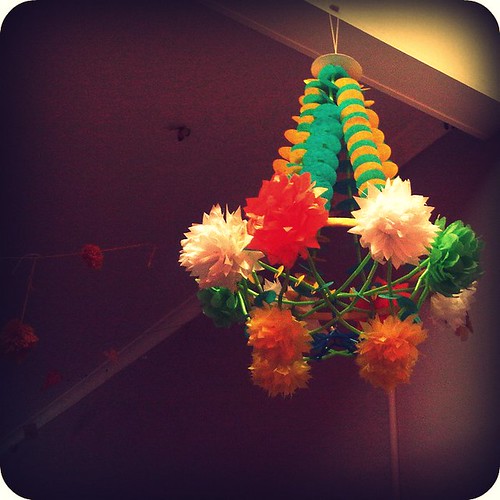
I've been wanting to make a paper chandelier for some time now and on the weekend I finally got the necessary supplies and got to it.

Yes, it does take some time to make one of these beauties, but it is well worth it when you're finished.

I'm thinking about teaching classes on how to make these traditional Polish paper chandeliers called Pajaki (pronounced pa-yon-kee) - translated it means "spiders of straw".

Originally used as Christmas decorations, these elaborate creations were made by families out of straw, scraps of paper and fabric to bring some cheer, colour and festivity to poorer households.

If you think you'd be interested in learning how to make pajaki, do leave me a note. If I get enough interest, I will consider running a class next year.

And if you're interested, check out this article I found on Polish Christmas traditions. You could do some of these with kidlets (yours or someone elses) or even on your own, to bring some festive cheer to your home for the upcoming Christmas holidays.

Friday, 28 October 2011

Make Hey!

Last night I went along to Pip’s book launch at Readings in St Kilda with my dear pal Katie. That’s her down there. Katie. Not Pip.  There were lamingtons, melting moments and ginger beer, lots of crafty folks and of course it was all centred around Pip’s new book Make Hey!
Katie = cute-face
the lovely spread of sweet treats
Pip welcomed us all and during her Q&A I asked her how she comes up with the ideas in her books.  Pip said that she thinks about things that she’d like to give to friends and family and gifts and then she figures out how to make them. While she’s out on a walk, she might see an interesting building and will think to herself that would make a beautiful quilt pattern. And that’s it my friends. It’s that simple.
lovely folks gushing over Pip's book
If you are a crafty type like me, then I’m sure you’re already familiar with Pip’s work. She runs the Meet Me at Mikes blog, has written not 1, not 2, but 3 books AND a crafty journal, runs Softies for Mirabel (now in its 5th year), writes for Frankie magazine and is a general all-round handmade and craft advocate.  I feel really lucky to live in the same city as Pip because it means there’s an increased awareness of handmade in Melbourne.
Brianna, Pip and Ari
I can honestly say that I have never before met someone as inspirational as Pip.  She has so much enthusiasm and positivity to share with anyone willing to listen it’s truly a breath of inspiration listening to her speak.
lovely photography and styling inside
Pip's books are easy to follow and made for practically a beginner right through to more experienced crafters. Make Hey! is shot and styled beautifully and the projects within it are things you could easily make for yourself or to give as gifts.  Such as the first project I'm tackling out of Pip's book: I heart you necklace.
the first project I'll be attempting out of Make Hey!
I am also very lucky to have such a lovely friend. Because my dear friend surprised me and bought me Make Hey! last night AND got Pip to sign it for me. We all need friends like that. We do.
Katie getting Pip to sign my surprise!
Following the book launch a bunch of us went and had a picnic in a nearby park right next to St Kilda’s Luna Park. And what a perfect evening for a picnic in the park. It was balmy and full of good food. Unfortunately I didn’t snap any photos of the picnic because it was already getting dark.

Thanks again to my lovely pal Katie, but this time for allowing me to use some of her photos from last night.  You’re a true pal xx
evidence that Pip is truly ace
P.S. if you head over to Katie’s blog she has a wrap up of last night’s event along with more pics. I believe she is sharing a photo of me from last night too. Oh dear.

P.P.S. if you haven't had the pleasure of owning one of Pip's books, I highly recommend you go and get yourself at least one of them. It's the perfect time with Christmas just around the corner. You could be making all your gifts instead of spending oodles of cash on mass-produced ones! It's so much more personal and meaningful.

Monday, 24 October 2011

good kitty, bad kitty, pretty knitted kitty

Let it be known that I’m not really a cat person.  We had a cat or two when I was growing up, but they were rare cats in that they acted and though they were dogs, not cats.  Don’t get me wrong, I don’t despise them.  If I see a cat at a friend’s place I will give it a nice little pat.  I just think they are evil and vicious little critters. That look on their face when they’re slowly fluffing their tail against the ground in a half-reclined state; you can tell they're scheming. And those claws just prove that they’re up to no good.

But when I stumbled upon this furry little kitty I must say my softie-loving-heart melted.  And how could you resist. It’s knitted AND it’s a two in one softie. Inside the good kitty lives a dormant bad kitty just waiting to strike.  A lot like the slow-tail-fluffing-kitty which I mentioned earlier.

via Flickr

via Flickr

via Flickr
This clever lady is responsible for the bad kitty creation and if you (like me) have fallen head over claws for this knitted softie, you can purchase the pattern for a mere $6 (US) over on etsy. Now I just wish I could knit.

For the record, I am an animal lover.  I’m just more of a rough-and-tumble-cuddly-dog-person than a claw-your-eyes-out-and-world-domination-cat-person.

LinkWithin

Related Posts Plugin for WordPress, Blogger...