Tuesday, 5 August 2014

dolly pincushion tutorial


With all the recent events I've been working on, I have just realised that I didn't share this sweet little dolly pincushion tutorial which I wrote for DailyLike.

If you're looking for a cute alternative to a plain pincushion or a as little gift for someone, then this simple little sewing project could be the answer.

Head over to DailyLike for the full tutorial

Wednesday, 25 June 2014

'Pajaki' Polish Paper Chandelier Workshop


So I'm pretty excited to be running a Polish Paper Chandelier Workshop as part of Unleash Creative's workshop offering at the upcoming Melbourne Finders Keepers Market on the 25th and 26th of July.

It's a 2.5 hour workshop where I will be sharing the history of 'pajaki' (including how to pronounce the word) and how they came about as well as showing how to make your very own decorative paper chandelier. All supplies and tools are provided as part of the intimate workshop and you'll walk away with your own custom paper chandelier to take home.

Spaces are super limited, so if you're interested, head over to the Unleash Creative booking page to get your ticket.

Friday, 11 April 2014

DIY: no-sew mad hatter easter bonnet


The other day I posted a fun DIY for making your own flower headpiece for Easter. Today, I've got another fun Easter project to make over the school holidays.

Monday, 7 April 2014

DIY: paper flower headpiece [easter]


Easter is less than two weeks away and if you're anything like me, then you'll probably be leaving things like decorations and Easter bonnet's until the last minute. So, in an attempt to save you and me from any last minute runs to the local craft store, I've come up with a couple of Easter bonnet headpieces for you and the small people in your life.

The first one which I'll show you today is a paper flower headpiece which is made using coloured cardstock, a couple of downloadable templates, scissors and hot glue. Easy peasy, fun and effective.

Monday, 17 February 2014

my interview with Creative Womens Circle


It's been a while since I've popped in to say hello, share some photos, projects or a few words. I thought it best that I told you that the majority of my time has been spent working on Unleash Creative which is a series of full day creative events in Melbourne, Sydney and Brisbane taking place over the next few months.

Saturday, 12 October 2013

frocktober


I've just popped in to let you know that I'm guest posting over on Clairey Hewitt today on the subject of Frocktober.

Click over to have a read and see the vintage dress I made!

Wednesday, 25 September 2013

unleash creative


When a dream calls your name loud enough you follow it. You follow it to the peaks of treacherous mountains, across seemingly bottomless bodies of water and through the driest of sandy deserts.

A dream has been calling my name for some time now. Yet the timing has never seemed right. That is until recently. 

Personal situations and circumstances along with the amazing support and words of encouragement from loved ones has lead me to finally launch a project that is very close to my heart and one that I'm extremely passionate about. 

At the start of this week I officially launched the website for Unleash Creative, a series of full-day creative workshops to get people thinking outside the square, get their creative juices gushing and push the boundaries.

Tuesday, 17 September 2013

DIY: piñata wrapping paper


Here's an easy and fun way to wrap a birthday gift... make your own piñata gift wrap!

Here's what you need:

  • tissue paper in different colours
  • scissors (I used herb chopping scissors with multiple blades, but you can use plain scissors)
  • glue stick
  • kids kraft paper or butchers paper

Monday, 5 August 2013

5 ways to use felt pom poms


pom-pom 
pom-pom (also spelled pom-ponpompom or pompon) is a loose, fluffy, decorative ball or tuft of fibrous material. Pom-poms may come in many colors, sizes, and varieties and are made from a wide array of materials, including woolcottonpaperplastic, and occasionally feathers
source: wikipedia

But you knew that already, right!?

If your house is anything like mine, then you'll have more bags of lollypop sticks, wooden clothes pegs, glitter, tissue paper and felt pom poms than you know what to do with. You might have supplies left over from a creative project, or you may have purchased them with the intention of making something with them but instead they've just sat unused taunting you all this time.

I'm slowly making my way through my craft supplies and coming up with new ways to use them. Today, I've come up with 5 colourful ways to use up your felt pom poms.

Thursday, 25 July 2013

make a paper garland using cupcake wrappers, straws and tissue paper

There's nothing wrong with store-bought paper garlands, but I'm all about custom, unique and one of a kind. I also think that being known for being creative amongst my group of friends, there's a level of expectation that I will make most things from scratch myself.

So when I was planning the decorations for my daughter's recent first birthday party, I started making tissue paper flowers. I wasn't sure exactly what I was going to do with them, but I knew that they would have a place within the overall confetti theme.

But it wasn't until I found some jumbo length straws in a two dollar shop that I got an idea. An idea for a fantastic straw and paper garland.  Here's how to make a paper garland in 5 simple (colourful) steps...

Tuesday, 23 July 2013

how to make festive cake stands

Here's a fun little DIY from my daughter's recent first birthday party.  As part of her confetti themed party I wanted to have some food displayed on colourful elevated stands. I didn't want to buy something specifically for the party, so I set out to make something unique (and budget-conscious). Here's how I did it and how you can do it too...

Monday, 22 July 2013

5 ways to decorate envelopes

Since starting the Creative Pen Pals project, I've immersed myself in all things snail mail. Because let's be honest, one of the greatest joys of receiving a penned letter is the initial reaction you have when you realise that there's an adorned beauty in amongst the bills.

Something I've found though, is that if you only have a couple of pen pals, the letter-writing kits which come in packs of 10 or 20 certainly start to become less exciting and more *groan* "there's that stationery again".

Don't get me wrong, I love me a cute printed letterhead, but I also love the uniqueness of receiving something that has been customised or is one of a kind. So it got me thinking. How can I easily create some lovely, colourful stationery that can be customised using the same technique but different supplies?

So I've come up with 5 ways that you can embellish standard envelopes (nothing fancy, just plain old envelopes from an office supplies store) with supplies from your craft stash. 

Thursday, 18 July 2013

festive party ideas on a budget: theming


Setting a theme for a party or special occasion is important for a few reasons. It enables you to:

  • select decorations that will compliment each other 
  • stay on track when selecting items and planning the overall day 
  • set a menu to match your theme

Please don't be daunted by the task of deciding on a theme. You don't have to go over the top (if you don't want to) and simple ideas such as choosing a colour or pattern such as dots or stripes will help you pull everything together in next to no time. Sticking with a basic theme means it's easier to customise party basics such as plastic cups, cutlery, napkins etc.

Of course if you want to be a little more elaborate and pick a mad hatter style party, then that's great too, but you must be prepared for the challenge, and the work involved.

Below is an example of a theme, menu and decorations that I'm sharing from my daughters' recent first birthday party to provide some inspiration.

Tuesday, 16 July 2013

festive party ideas on a budget


My littlest one turned one on the weekend.  For a week leading up to her birthday, I was making lots of decorations and preparing for her party on Sunday, using every spare minute possible to cut, paint, glue, stick and create.

We didn't have a budget in mind, but as it was only a small party being hosted at our house, I didn't want to spend too much money. And if I can make it myself, then you know I will always accept the creative challenge.

The theme I decided on was 'confetti' which made it easy to customise the decor and to create a lot of things from scratch using paint and stickers along with some cheap supplies. It made the entire theming colourful, whimsical and fun.


Over the course of the next week I'm going to share with you the menu, decorations and ideas so that you can create your own confetti themed kids (or grown-up) party on a budget or find inspiration in everyday objects to DIY your own do.

You'll be amazed at how easy (and cheap) it is to create a colourful setting that'll have your guests swooning.

Tuesday, 28 May 2013

handmade nursery


It's been a while in the making, but I've finally taken photos of my daughter's room, to share just how easy it is to create a sweet handmade nursery for a baby on a low budget.

Most of the items which I made were created using existing supplies which I already had on hand. Scraps of patterned paper make festive bunting, fabric scraps turn into cushions and recover an old lamp and felt pom poms float on thread or can be glued to just about any surface.

Let your imagination, with the help of Pinterest, transform existing objects into something new to adorn your little ones' room.

With touches of crocheted, embroidered, quilted and stitched objects, your growing bundle is going to appreciate the textures, patterns and colours of the visual feast you have provided them.

Saturday, 25 May 2013

read it: *bespoke* magazine


If you're reading this, then chances are you subscribe to a few creative blogs. But do you always read them? I know I don't or can't always dedicate the time to sit down each day and read my fave blogs.

Magazines both of the physical and digital kind are a great go-to when I need some inspiration or a diversion from chores. They are digestible morsels of curated information, inspiration and beauty. They're easy to read and you can skim over any articles that don't interest you to find ones which are more your flavour.  Mmm, flavour.

There are quite a few crafty magazines out there, but a personal favourite of mine is *bespoke* zine. Why? Well it's produced in Australia and contributed to by the handmade community. People that you may know and interact with on Twitter, Instagram, Pinterest and Facebook. All there sharing their tips with you, the reader!

It's packed with tutorials from clever crafters, insights and tips from successful indie business owners, stories to help you start out your own handmade business, recipes (mmm food), links to shops selling handmade, and a butt-load of inspiration.

The cover of each issue is illustrated by a different illustrator, graphic designer or artist. So as you can see it really is a collaboration of creative proportions.  

Now if this sounds like a magazine you'd be interested in, you might want to help out by pre-ordering a bumper issue that the editors are trying to get off the ground.  In order to print a huge 100-page Winter edition, the eds of *bespoke* are calling out for people to get behind them and pre-order before May 31st. Show your support for handmade and creative. Jump over and pre-order now!

The lovely editors at *bespoke* have offered up a 12 month (3 issues) digital subscription worth $25 for one of you to win! 

All you need to do to enter is leave me a comment on this post answering either one of these questions:


Have you read *bespoke*? 
What's your favourite creative magazine?


the small print
Value of digital subscription is $25
Digital subscription is for one year or three issues of *bespoke* magazine
Issue 10 will be out July 31st, Issue 11 is released Nov 30 and Issue 12 will be early next year
Entries close Friday 31st of May at 8pm. 
I will draw a winner randomly through random.org

Tuesday, 14 May 2013

creative supplies offer

envelope tin $6
The past couple of weeks I've been quiet as a mouse over here because I've been working away at matching up the almost-200 creative pen pals which have signed up for the snail mail exchange.

This week I'm sending out pen pal information emails, so if you're eagerly awaiting news of who you've been matched up with, please have faith that an email is on its way.

Today I'm just popping in quickly with a lovely offer from Angie at the Shop Creative store. 
paper stickers $5.50
To help you get started (or add to) your letter writing kit, or to just simply stock up on some creative supplies, Shop Creative have offered a 10% discount on your purchase until 24 May 2013. Simply use the code CREATEPENPAL at checkout for the discount to be applied. Please note the discount does not apply to shipping charges and can't be used in conjunction with any other offer.

arimail stripe washi tape $3.50
So pop over, see if something takes your fancy and get ready for news of your pen pal(s)!

Thanks for your patience and understanding that I am a one-woman-show (with a young family) and not a machine!

Wednesday, 1 May 2013

5 creative uses for your DYMO label maker


It may come as no surprise that I'm an appreciator of stationery and office-related tools and accessories. However, anyone who steps into my craft studio would be forgiven for thinking I was moonlighting in office administration. I like to be organised and I like the challenge of using seemingly boring and conventional items in a variety of creative and unconventional ways.

So I was rather excited to be set a challenge on how to use a DYMO label maker creatively. Sure, you can use it to add labels to index tabs in ring binders and the like, but I have come up with some other ways in which you can get creative mileage out of your label maker at home.
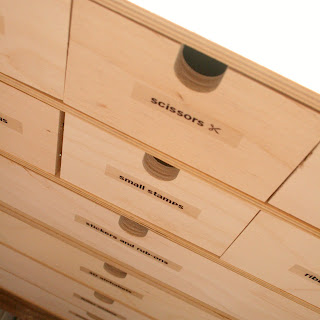

ONE: organise your craft tools 

I have sets of drawers throughout my craft studio. It's the only way I can stay semi on top of where things are stashed. Plus drawers can put a pretty face on the mess that might lay within.

It's all about the pretty face. Especially if you're anything like me and regularly do a craft "dump and run" when cooking and other domestic duties call.

So, why not make things even easier by creating labels for your drawers.
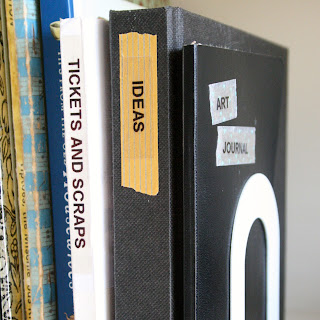


TWO: give your notebooks names
I like a good notebook. I have one for "ideas", one for scribbling in, another for art journalling, one for sticking random memorabilia into and a few more with to-do lists and equally as random stuff in them.

I do my best to remember which is for what, but now I have my handy-dandy friend to help me give them all names.

Use some contrasting washi tape as a base for your clear plastic labels. It will add a bit of fun and element of colour.
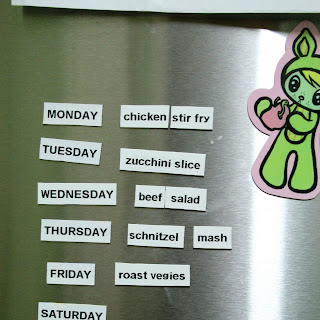


THREE: magnetic meal planner
Over the years I've tried various methods to staying on top of planning dinners for the week. The fridge is the obvious communal place for family members to have their input on what will be consumed for the week.

Print out labels for each day of the week along with each dish that's in your dinner repertoire. Stick the labels onto unwanted large flat advertising magnets (eg "Jim's Plumbing") and trim them down to the size of the label.

Stick them onto your fridge and each week, planning out dinners (and grocery shopping) will be a breeze!


FOUR: jars need names too
A few years ago, in a bid to be more grown-up, I started making my kitchen more functional. After several trips to Ikea, I had lots of lovely, some fancy and many functional things to make our home work better for us.

I bought jars. Lots of jars. I started filling the jars. I arranged them all in a pretty line. I forgot what was in some of said jars. I labelled jars. I now know what is in my pretty jars.

I realise "sprinkles" don't really need to be identified, but I couldn't very well leave them nameless.


FIVE: visual cues
Upon the suggestion of an instagram friend, I recently started a vision board. I chopped up magazines and collected lovely pictures and phrases of how I'd like my life to shape itself.

I started glueing all of my gathered items onto a large piece of poster card. But there were some obvious words missing which could not be found in my magazines.

I adjusted text heights and formats before printing labels with key words to add to my vision board.

You could do the same with scrapbooking. It's much quicker and economical than printing a page, cutting and then glueing. Especially if you only need a few words.

Here's some nifty facts about the DYMO LetraTag which I've used in these projects:

  • The labels come in paper, plastic, metallic and iron-on finishes in a range of colours (depending on the type of label).
  • It has the capabilities to print onto two lines
  • There are five font sizes
  • You can add borders around text
  • It is super easy to use 

Do you own a label maker? If so, have I inspired you to dust it off and use it creatively? What will you use it for?

Don't own a label maker? Well then, this is your lucky day. The folks over at Newell Rubbermaid have been very generous to give me a DYMO LetraTag to giveaway to one of my readers along with refill tapes.

Would you like to win? Read ahead for details...


DYMO COMPETITION DETAILS

  1. Entrants MUST be Australian residents. 
  2. To enter simply leave a comment on this post. It can be anything. You can tell me what you'd like to use the label maker for. Or whatever you'd like to say is fine.
  3. Entries open Wednesday 1 May 2013 and close Friday 3 May 2013. 
  4. I will randomly select a winner on Saturday 4 May 2013. Winner will be notified by email.
  5. The prize is a DYMO LetraTag LT-100H along with two refills with a RRP of AUD$69

Thursday, 25 April 2013

how to be a great pen pal


I'm so excited to tell you that to date we've had over 90 sign-ups for the creative pen pals project. If you haven't signed-up yet, but would like to join us for this awesome snail-mail revolution, you have until end of day Friday to do so.

Since launching this initiative, I've been giving a lot of thought to what, how much and how often I'll be writing to my pen pal as well as how to write interestingly and keep the letter-writing going. As it is becoming a bit of a lost art, I thought I'd cover off a few key areas about being a great pen pal.

What should I write in my first (introductory) letter?
You'll want to get to know a little bit about your pen pal and they will want to learn about you too! Start off your first couple of letters with information that includes where you're from, how old you are, if you have children, what you like to do in your spare time, where you work etc.

Tell them your story. Tell them who you are and you'll find that your pen pal will open up to you more.

"Tell them who YOU are"

How often should I write?
Well, this is really going to depend on how quickly your pen pal writes back to you.

As a general rule, I wouldn't leave responding to a letter more than two weeks if it's someone in the same country as you and one week if they're an international pen-friend. But ultimately if you respond within a week (and factor in mail delivery times), then it will be 1-2 weeks before you get a response.

The quicker you and your pen pal write (and more importantly, SEND) letters to each other, the sooner you'll be running to the letter box in anticipation of receiving pretty mail.

"you'll be running to the letter box in anticipation of receiving pretty mail"

What should I write about?
Let's start with what NOT to write about. Religion, politics and other similar strong views should be kept out of this type of communication. You don't want to risk offending your mail-mate.

Once you've gotten the introductions out of the way, you should be able to find common topics that interest you both. That shouldn't be too difficult if you've joined the Creative Pen Pals project as you will be matched up with someone who has similar interests as you.

It's nice to write about yourself, but don't forget to ask questions about your pen pal. That way it will keep the letter-writing and responding going rather than having to find new topics to start off your letters with - but that is ok to do too.

"Don't forget to ask questions about your pen pal"

How much should I write?
Don't feel as though you have to write a short novel each time you write. If you are feeling pressured by time and don't have enough time to write as much as you'd like, then just write a page and tell your pen pal what's currently taking up your time.  They'll appreciate a short response much more than no response!

When you have time on your side, you can sit down and write a few pages. Keep in mind that the reading part should be as enjoyable as the writing part. If you know that your pen pal is currently time-poor, they're probably not going to have time to read 10 pages of what you got up to on the weekend.

"They'll appreciate a short response much more than no response!"

Lastly, capture that feeling of opening your letterbox and finding a gorgeous, colourful and wordy treat that's NOT a bill. Now replicate that and make sure you are really proud of what you send out. Add a little personality to your envelope with some stickers, stamps or doodles. No doubt your pen pal will squeal with delight when they receive it. Check out this post for some inspiration.

Wednesday, 24 April 2013

how to create a letter-writing kit

In anticipation of the Creative Pen Pals project kicking-off (have you signed-up yet?), I thought it'd be exciting to start compiling a letter-writing kit for the many letters we're about to exchange. 
And obviously Mel from One Crafty Mumma had the same idea. If you follow Mel on Instagram, then you might have seen her posting about her new stationery supplies. So, I asked Mel to give us some tips on pulling together a letter-writing kit. And here's are her pearls of wisdom (thanks Mel!).

Eep! I'm feeling so happy and excited to be taking part in this wonderful snail mail swap and for the last few weeks I've been busy creating myself a letter writing kit.  For me, gathering and selecting pretty items to use for my letter writing is {almost} as much fun as receiving and sending mail. 
I love having nice supplies on hand for letter writing and keeping them together in the one spot so they're ready to grab when needed.  The lovely Magdalena asked if I'd like to share my letter writing kit with you all, so here I am!

It's not essential, but I like to keep all of my supplies together and at the moment I'm using one of two things for that - a fabric wrap {shown above} that holds cards, envelopes, a cute pen, mini tags and stamps.  I received the wrap in a swap a couple of years ago {super lovely!} and it's been so well used.  The pattern is a freebie from Soulemama's blog, so you can make one too!  HERE is the linky for it.  My other storage item is a shoe box!  Nothing fancy, just an ordinary shoe box to hold my other bits and pieces.

Now for the fun bit - what to keep in your writing kit!  Oh, there's so much goodness to include - and I'm sure way more wonderful things that I haven't thought to add yet.  Here's a list of my 'must have' supplies:
  • Pretty writing paper - there's so much available online {try Etsy, Ebay, stationery stores} but there are also lots of other options too: make & print your own or pretty up some lined paper with nice stamps, washi tape or stickers.
  • Washi/decorative tape - I'm such a fan and I love sealing envelopes with my tape or adding a tiny piece to the top of my letters.
  • Pen - I keep a nice one in my letter wrap because there's nothing worse than writing a letter with a dodgy pen ;)
  • Plain shipping tags - there are SO many cute things to do with a shipping tag and they're nice to add extra notes or a quote onto and include with your letter.  I'm going to be sharing a mini tutorial over on my blog for this very soon!
  • Stickers - super nice to pop on an envelope or letter.


  • {A few of my favourite letter writing stationery sets}
  • String/yarn/thread - Perfect for holding folded letters together inside an envelope and also cute to tie around packages that you might be sending.
  • Postage stamps - Keeping a few of these on hand means you can write and post on the go!

  • Rubber stamps - My favourite one is a date stamp, but word & graphic stamps are also nice to use on letters and envelopes.

Apart from the supplies that I've mentioned above, you can also start reusing bits and pieces that you might have received in the mail or come across in your travels.  All of those goodies in the above photo were rescued from packages or mail that arrived in my mail box last week - they'll be wonderful to use on upcoming letters and envelopes.
So, there you go!  I hope you have as much fun putting together your supply kit as I did.  Thank you for reading and happy snail mail writing.

Thanks for those great tips Mel and for writing this guest post. I'm rushing off to start pulling together my letter-writing kit right now!  
And another reminder that sign-ups for the Creative Pen Pals project close THIS Friday!

LinkWithin

Related Posts Plugin for WordPress, Blogger...